mini-series: life changing management tips

isn’t it interesting how making tiny changes can have such a big impact?  the dermatologist (and deanna) has always insisted that i drink tons and tons of water.  it wasn’t until recently, that i actually got around to doing it (why?!) when i noticed what a major change i saw in my skin.  i got to thinking about the way that just a few small changes in classrooms (like in life) can really make a big difference.  in the next few days, we’ll share some shifts you may consider making when you start the school year, and we bet you’ll be pleased with the large-scale outcome.

get set-up!

this one’s an oldie but a goodie that i always feel like everyone knows about, but time and time again, teachers confess this *new* little tip changed the entire vibe of the workshop.

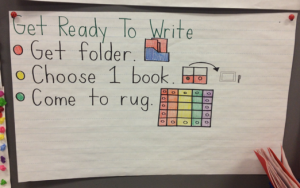
here’s the deal: have your kids SET UP for the workshop before they come to the rug. the way this looks varies from classroom to classroom, but the end result is the same: after you name the link of your minilesson, or as i like to say, the little bow on the package of the gift, kids can tiptoe right off to wherever it is that they read or write, and actually start reading and writing.  

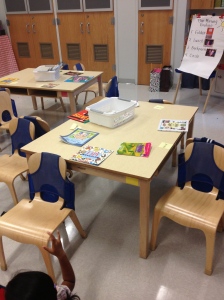
here’s one possibility of how the set-up time can look:

Untitled

reading:

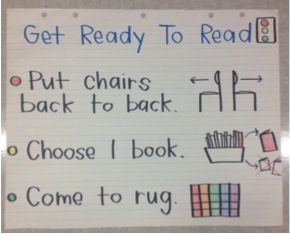
  1. turn your chairs back-to-back the purpose is twofold: kids sit this way so that they’re less distracted at their tables than they would be if they were all facing into the middle AND when it’s partner time, a simple movement to turn chairs side-to-side allows kids to work right away with their partner.  (quick tip: remember to have kids sit next to their reading partner at their tables, otherwise this wont work as smoothly!)
  2. choose one book when kids come back to their table spot to begin reading, the first book they want to read is right there waiting for them, they don’t need to waste any time digging through their book baggies before they get started.
  3. come to the rug

IMG_3173

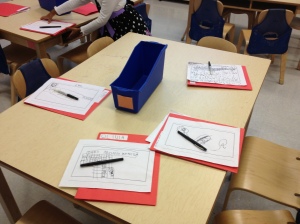
in writing, you’ll probably try a similar version, having kids take out their writing folders, and choose one “book” (writing piece) from their folders before they come to the rug.

Screen Shot 2014-08-06 at 7.15.46 PMIMG_3211

i’m telling you… you will feel a sense of calmness and readiness as kids leave the rug to go off and begin working.  and, more importantly, you’ll notice more kids actually trying out the strategies you teach in the minilesson, because there’s no interruption in their brains between the link of the minilesson and when they actually get started working.

in the beginning of the school year, it helps to do a super quick shared reading of the chart you’ve made with the steps to get set-up before the kids actually do it.  if you have them do this for a week or two, the kids really internalize the process.  remember, too, that you don’t need to keep these charts hanging up all day long (and definitely not all year long).  i usually put this up on my easel when we get set up and then put it away since it’s not going to support kids while they’re actually working, and of course, that makes room for other charts they really will use.  i’ve also taken a photo and made smaller copies to go in book baggies for kids to read (which they love.)

speed up transitions

with all the transitions in the workshop, teachers are always looking for a way to make kids move more quickly.  i’ll tell you what doesn’t work: rushing kids.  the more you rush them (“hurry up!”  “you’re late to the rug, line, etc.!”) the slower they go.  this isn’t rocket science – when we do this, we stress kids out.  and what happens when we get stressed?  our brains don’t function as efficiently.  think of a time you felt a high amount of stress, maybe because you had a bunch of things left on your to-do list for the dinner party you’re hosting, that begins in a few minutes, and oops, you haven’t even showered yet.  in every effort to move quickly, you notice you’re actually doing quite the opposite – dropping things, forgetting what else you need to do.

setting up before the workshop will help kids when they are sent off from the minilesson, and even when they transition from independent time to partner time.  but what about the end of each workshop, when we invite children to the rug for a closing, or the share?  is it just me, or is this the time when i notice a lag in their steps – it’s like there’s less of a sense of urgency here for some reason.  BUT  the share is another opportunity for teaching, so it’s important to get all the kids to the rug quickly so that they don’t miss out on anything.

i realize there might be a major revolt when i say this, but it makes me a little nuts when i see big timers essentially “rushing” kids to the rug (especially when it means the whole class “gets” something, a point, a smiley, a whatever) if everyone is there on time.  i’m not saying there’s never a time and place (pun intended) for timers, but for me, this just isn’t it.

instead, i like to teach kids what the share time is.  i often explain in the beginning of the year some of the fun things that happen during the share, and why they’ll want to get back to the rug quickly so they don’t miss it.  so, when i stop my readers or writers from their work, and announce that it’s time for the share, kids start moving.  here are a few ways you can help to speed it up:

-read a story. this is my favorite option.  here, i’m not talking about the interactive read-aloud you’ve planned for the day.  i’m talking about reading little leveled books that come straight from your kids book baggies.  you know, the ones we want them to love and reread again and again, yet we’ve never bothered actually reading them to the class?  here’s the perfect time to squeeze in a quick read aloud of books leveled at A-G, which take no more than 3-4 minutes to read.  at the end of the year in kindergarten, i had kids reading on levels D-H that still wanted to shop for books like Worm Builds and BIngo Goes to School.  not only will this get kids to fly to the rug because they don’t want to miss the story, but it will also share the message with your children that the books they read are stories we can love just as much as any others. 

-play a song. tell children they should be on the rug by time the song is over.  be realistic about how much time you give children to clean up.  to really put everything away properly and get settled, it probably takes 3-4 minutes. this is less stressful than having this big timer in your face, in my opinion.

cut some slack.  bear in mind, some children might need additional support during transitions.  many children who exhibit difficult behaviors tend to experience that difficulty during this less-structured time.  this is where individual charts and checklists may come in handy.  

hang tight… more management tips heading your way throughout next week.  what are your favorite management tips? what part of the workshop would you like us to share some management tips for? let us know! @alyssalnewman @dee4soul

cutesy-ness or kid-ness, part III

last year, we told you about our ‘80/20 vision;’ a promise to ourselves that 80% of the classroom would be student generated.  it’s easy to go overboard with the cutesy-ness, but it’s purposeful to go overboard with the kid-ness, especially in a pinterest-loving world.  we’re here to make this concept more widespread, and to urge teachers to consider involving your students in the creation of the classroom environment.

when alyssa worked in the south bronx, she and some colleagues did some inquiry work around reading identities (shoutout to kristin smith and jessica stillman!)  as part of the inquiry, she asked her second graders, “what kind of reader are you?” and was painfully shocked when nearly all of them defined themselves as their current reading level in the first week of second grade. “i’m a level J reader,” “i’m an H reader,” and so on.  one simple suggestion she received to help transform her students’ thinking was to start making big changes to the classroom library.  it’s tough to define yourself as anything  other than an “L reader” when the only books you shop for come from a bin with a level L – big and bold – on the front. (thanks to jennifer serravallo for lots of inspiration here.)

here are some tips to make that shift:

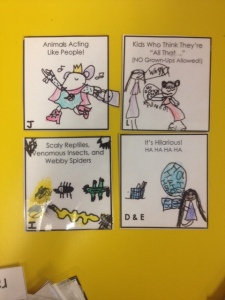
-use a few teaching shares in the workshop to have students sort books by topic instead of by level. books across all levels can fit into a similar topic like animals, nature, family, and so on.  after the books are sorted, help children come up with names for the sets of books.  invite them to think of a title for the set of books that would get others excited about reading those books.  (an interesting connection can be made to marketing. which cereal boxes would you choose? why?  which bin would you want to shop from? why? this worked well in alyssa’s class.)

levels are still visible for children when shopping, but they're not the primary focus.  don't you just love the fun titles they came up with?!

levels are still visible for children when shopping, but they’re not the primary focus. don’t you just love the fun titles they came up with?!


-create bins with character series so that kids can choose a series they’re interested in reading.  this also supports the work of pushing children read across a series.

here's the "before" labels, which were completely teacher made. yes, they look pretty, but there's no student involvement here!

here’s the “before” labels, which were completely teacher made. yes, they look pretty, but there’s no student involvement here! we don’t do this anymore…

and here’s the after! the first time alyssa tried this, she wasn’t ready to completely relinquish control, hence the typing and laminating. those days are over now though; let the kids write! the level of the series was added before these went on the book bins, small and in the corner.


-allow students to shop for other books, aside from books at their just-right level.  we have our students shop for three “heart books” each week, books that they love or are interested in, regardless of the level.

now for some thoughts on the kid-ness, rather than cutesy-ness.  we know there’s something weirdly stimulating about the art of “label making” for teachers.  but, we urge you to reconsider.  the perks of giving up the urge to decorate and let your students take control are really endless, but here are a few of our favorites:

-students have an opportunity to explore the library and see what kinds of books are waiting to be read.

-students have input into how the library itself is organized, and will be able to book shop in a more efficient manner when they know where things are.

-talk and conversation around reading identity is inevitable during this process. “oh, you like ivy and bean?! so do i!” “i really want to learn about snakes this year!” reading relationships will be formed this way.

-this is a beautiful way to build a community of readers, and an especially lovely mini-celebration during your first reading unit.  it ties in perfectly as all first units focus on habits, expectations, and learning more about ourselves and each other as readers.

-and yes, we’ll say this too: you don’t need to spend hours searching images on google, fighting with the text boxes on microsoft word, printing, laminating and cutting!

so, take a look at deanna’s book baskets in her third grade classroom.  you’ll notice that she hasn’t put a single label on any of the bins containing leveled or un-leveled books.  and in case you were wondering, she’s not loosing any sleep over it!

photo 1


she’s planning to do some labeling with her students across the next few weeks, starting with series books.

in case you were wondering, we just use index cards or labels for kids to write on and stick them on with scotch 3mm tape which is indestructibly sticky. as long as you put it on all four corners, it will last all year without laminating, which sometimes causes a glare and can make it tough for kids to read while shopping.

we just use index cards or labels for kids to write on and stick them on with scotch 3mm tape which is indestructibly sticky. as long as you put it on all four corners, it will last all year without laminating, which sometimes causes a glare and can make it tough for kids to read while shopping.


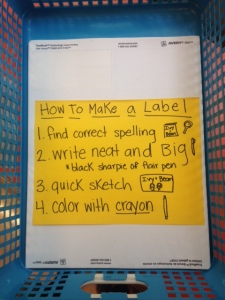
we also encourage you to think about ways you can transfer this work into other parts of your classroom for the same beneficial reasons.  for example, our kids made the labels for all the materials in our writing centers [kicking ourselves for not having a photo for you!]

we know it can be tough to forgo the font-picking, picture cropping, and so on, but we hope you’re considering to stop stressing about those labels that didn’t stick well, pun intended, on the first day, and to gear up for some more student-made labels in your room.  we would love to hear your thoughts around inviting more kid-ness into your classrooms.  tweet us your pictures, too! alyssa- @alyssalnewman deanna- @dee4soul us-@primelearningad

A & D

new year, big news!

hello to our favorite followers! it’s been a while. we hope your summer vacations were filled with wide smiles, big laughs, and lots of relaxation. you’re probably fluttering around your classrooms (like us) refilling book bins and getting writing paper ready for the first day. there really is nothing like that “back to school” feeling.

now, without further adieu, time for the big news. (!!!!)

alyssa:

alyssa is taking on a new role in her nyc public school. she is now the reading recovery/setss (special education support service) teacher.  as the reading recovery teacher, she will attend NYU’s amazing reading recovery program, where she will closely study the work of marie clay, and use learnings to support first grade students who are struggling with reading. she has/is/always will be extremely passionate about inclusive education, and finding ways to adapt and modify curriculum to meet the needs of all students.  she looks forward to supporting both students and classroom teachers in working with students who have different learning styles and a wide range of needs.

deanna:

deanna will be movin’ on up with the big kids this year… to third grade! (yes, you heard us, third grade!) after four years in kindergarten, deanna felt she was ready to try something new.  many of her students will be ones she taught in kindergarten, which makes this year extra special. she’s spent much of her summer at institutes preparing for some of the bigger shifts in her work (chapter books, essays, and fractions?!) and lots of time reading books her third graders will be into. interestingly enough, she’s already realizing how much her time in K will positively influence the work she will be doing with her older kiddos.

us:

we are thrilled to share a new adventure we have begun together.  a few months ago, we launched an educational company, prime learning advisors.  our goal is to provide tailored and comprehensive instruction to meet the needs of children, families, and educators. we are currently providing services for tutoring (NYC, only) curriculum development/workshops, as well as preparation for higher education. (check us out here: www.primelearningadvisors.com // follow us here: @primelearningad // link up with us on linkedin // contact us here: info@primelearningadvisors.com) it’s been a thrill to support some of our followers in real life, so please reach out to us if you feel we could support you and your team or school in some way.

lastly, we want to thank you for your continued support. we were humbled this summer to meet so many of you and hear your kind words, and we especially loved many of the, “it’s the primary perks girls!!!” plan to check in with us as we get our blog up and running again throughout the school year. in fact, check back with us later this weekend for some back to school tips and reminders!


prioritizing priorities: D’s updates

this was me (deanna) before break: “omg my kids are driving me insane.” we all say those things sometimes because, well, they’re true. those little behaviors that can get sort of overlooked in those weeks before a break (trying to finish up units, fit in a million celebrations, don’t quite have the energy, etc. etc.) can make us crazy. over the break, i spent a lot of time thinking about the students who were taking up a lot of my mental space when i would come home at night (why is student A constantly touching other kids? why can’t student B remember to put up a quiet thumb when he wants to share his ideas?)

make a plan to improve behavior

first, i thought about the kid as a whole. what are his strengths? what does he love? what does he struggle with? from there, i thought about the behaviors that are negatively affecting his day-to-day school life. this was the hard part: i chose ONE behavior to focus on – the behavior that is the most prominent (OR if there is a behavior that is dangerous to the student/others around him, i chose that one). in one case, the negative behavior that i chose was: touching other students in unsafe ways (hitting, kicking, pinching).

then, i thought of the positive behavior that i wanted this student to do instead of the negative one: keep your body to yourself (instead of “do not hit”). we had done a lot of work with “body to yourself” in the beginning of the year, and are still revisiting those conversations, so i knew that this student would understand this goal. some important things to keep in mind when choosing a behavior goal:

  • use clear and specific language. so, instead of the goal being “i will be safe and kind” (even though that is essentially what i am getting at here with this goal), i used concrete language that i knew my student would be able to apply: “i will keep my body to myself.” this goal names the exact behavior that the student should do.
  • the goal should be able to be assessed objectively, by you AND the student. keeping your body to your self is pretty black and white, you either do it or you don’t, and the student knows what it looks like when he is/isn’t doing it.
  • sometimes it is necessary to make the goal even more specific by saying where or when the student is expected to show the behavior.

so, i turned this goal into: i will keep my body to myself on the rug, in line, and when i am playing. (know that this was not this students first behavior plan. in the beginning of the year, the goal was “i will keep my body to myself on the rug.” so the goal became a little broader after the student became better at keeping his body to himself on the rug. baby steps…)

tools to help students meet their goals

after i determined the goal, i thought about which supports could be put in place to help this student be successful. i’ve always used behavior charts but it wasn’t until this year that i was introduced to social stories (thanks alyssa!!) so, for this student i created a social story AND a behavior chart.

social stories: the purpose of a social story is to address a specific behavior in the context of social cues and situations in order to help students better understand the behavior and what it looks like. to create the social story to address “body to yourself”, i used this website as a guide: how to write a social story. each page addressed the goal in a different way with one or two sentences per page. i wrote the words but left blank spaces for the child to draw the pictures.

having the student participate in the process of “writing” the social story teaches them to be more reflective of their own behavior and thoughtful about the behavior they need to get better at.

having the student participate in the process of “writing” the social story teaches them to be more reflective of their own behavior and thoughtful about the behavior they need to get better at.

behavior charts: when making the behavior chart, i considered two things: 1. how can i realistically keep track of this goal, so that the feedback can be consistent? 2. how can this student use it as a tool to self-monitor his own behavior? i like behavior charts that are clear and simple with minimal text, especially for the little guys, so that they can use them independently. both charts below say what the goal is and have a picture of what it looks like. these are drawn by the student but i also use photographs of the student doing the behavior, especially in the beginning of the year.

IMG_4631 IMG_4625

the chart on top gets filled out by the student anytime after a lesson on the rug (pretty often). she colors in a box for each time she is a “listener” on the rug. the picture she drew highlights the specific listening behaviors she is working on. once the ten boxes are filled in, she gets five minutes to play with the finger puppets we have in our pretend play center (she chose this reward).
the chart on the bottom gets filled out twice a day: once before lunch and a second time at the end of the day. he draws a smiley face if he keeps his body to himself on the rug, in line, and when playing and a sad face if he does not. when he gets four smiley faces, he gets to go visit his sister in another classroom for five minutes (he came up with this reward).

rewards and consequences

i always like to involve the student in choosing the rewards that accompany the behavior plan. i ask the student what they would like to get when they meet their goal (after i’ve already explained to them what they need to do to “meet” the goal). they usually are able to come up with great ideas (five minutes with legos, reading a favorite book, picking a sticker from the sticker box). i stay away from giving out “prizes” because the students usually think of things that are much more meaningful to them AND i don’t have to go out and buy anything!

consequences can get a bit tricky because the behavior charts themselves are only meant to reward the positive behavior. however, i think that it is equally as important for students to recognize when and why their behavior is inappropriate and reflect on how they could improve it. depending on what the behavior is, i usually have a conversation with the student about why it was inappropriate and how they can fix it. for example, if a student hits his friend he will often suggest writing an apology note and personally apologizing to his friend. here are some helpful links to read more about logical consequences.

managing the behavior charts that manage student behavior…

…can feel like a lot to remember. but, in order for any of these things to actually work, it’s important to be consistent. here are some things that help me do that:

  • decide on one place around the room where the behavior chart and social story will be kept. make sure this spot is easily accessible for both you and the student because you’ll want them to be able to fill the chart out on their own. i like keeping them on clipboards that hang with a tack on the wall – super easy!
  • let all the student’s teachers know about the behavior plan and explain how it is used. this way, the child is held accountable for that behavior throughout the whole day.
  • tell the student’s parents about the plan and explain how it will be used in school. they may want to use the same plan at home to keep the consistency, especially if they are seeing the same negative behaviors. often, the parents can be the ones that provide the reward when the child earns it.
  • most importantly: stick to the one behavior goal the child is working on. if the goal is “keep your body to yourself” and the student does this, BUT was talking throughout the whole minilesson, you would still acknowledge that he kept his body to himself and met the goal (as hard as it might be to do this.)

i know that there are so many different ways to address behavior in your classroom and would love to hear what you do! alyssa and i are patting ourselves on the back for sticking to our goals this week (and trying not to stress ourselves out about all the other goals we want to have…) we loved hearing your thoughts last week, so keep it up!

prioritizing priorities: A’s updates

i’m (alyssa) fortunate to work with a team of brilliant colleagues who reshaped my ideas about mathematics… pretty much the second i stepped through the door. (confession: i am former full-on math textbook teacher, trying to differentiate, trying to make math better, not knowing how… that’s what happens when your masters is in literacy…)

i learned how to assess kids with a “math interview” (created by us, with help of other schools, staff developers, etc.)  here are some of the big ideas our kinder math interview assesses, which of course align directly with the CCSS:  magnitude, sequencing, number ID, number formation, cardinality, conversation, 1:1 correspondence, part-whole relations, place value, hierarchical inclusion, fact fluency +/- through sums of 6, and of course rote counting (by 1’s, by 10’s by 1’s from any given number, backwards from 10, backwards from any given number.)

after i assess all my students (i use the interview 3 times a year) i use a whole class spreadsheet, one for rote counting, and another for all the big ideas (see below-thanks to my blog buddy deanna-what would i ever do without you in my life-who created this), which allows me to see what my mathematicians know, and what they need to work on.  this spreadsheet helps me create math partnerships.  just like reading/writing partners, i group students quasi-homogenesously, and i say that intentionally because it’s impossible to perfectly pair students with the exact same strengths/next steps.  the truth is, i wouldn’t want to do that anyway, since the kids complement each other in different ways, so i’m looking for similarities in what kids know/need to know when i create my partnerships.

Image

i want to talk here specifically about math games now, since that’s my “big focus” of the week (as promised). we typically play math games three times a week, but think of math games as an equivalent to guided reading, only for mathematics. while kids are off playing games, i pull a small group of kids to the rug either for a strategy lesson or guided math, and often leave partners with a math game to add to their bins, the same way i would leave a group of students with a book to practice in their book baggie.  i try to see everyone once a week to for a small group.  the games i choose to leave with partners are appropriately challenging, a notch above where they are–for example, if kids are starting to understand part-whole relations, i’ll give them a game to help support their understanding of this big idea.  things get a little hairy here, especially for me who loves to think in continuums, because young mathematicians do not necessarily begin to understand mathematical concepts in a specific order–it’s a little messier than that.  this landscape of learning has been the foundation for my understanding (and also support in reminding me that not everything in life, and definitely in early childhood education, is so linear!) http://www.contextsforlearning.com/samples/k3LandscapeofLearning.pdf

my colleagues and i get games from different curriculums (mostly TERC), out of many books (listed below), from the internet, as well as just putting our heads together and making up our own. i’m sharing two examples of games below, unfortunately, i don’t know who to give credit to for these, so if anyone knows and wants to share in the comments, go ahead!

big idea: part-whole

game: how many am i hiding

materials: cup (you can’t see through), 5 counters like beans, small blocks, or coins (number of counters can be adjusted to a higher number as you see your child master 5 items).

how to play:

players decide who will go first

player 1 shows player 2 the number of items that will be used.

player 1 can ask, “how many items is this?”, and player 2 will say 5 items.

then player 1 hides a certain number of items underneath the cup, leaving some items outside of the cup.

player 2 has to tell player 1 how many items are hiding underneath the cup.  Player 1 can also ask, “how do you know?” to see if player 2 can explain their thinking.

then player 2 repeats steps 2-5

big idea: counting on, fact fluency

game: rock n’ roll

materials:  dice, pen/pencil, sheet of paper with 3 columns and 10 rows.  The first column can already have one single number filled in each box.  This first box can be filled in with any number 1-10.

how to play:

players decide who goes first

player 1 rolls the dice

player 1 writes the number they rolled in the second box of the first row

player 1 counts up from the number in the first box and adds the number they rolled

then player 2 repeats steps 2-4

keep going until board is full

some of my favorite things (mostly books, since i can’t put people here) that forever changed my teaching of mathematics, aside from my patient and nurturing colleagues, include:

everything(!):

metamorphosis teaching learning communities & my fabulous staff developer (hi SS-i live for your brilliance!)

http://www.metatlcinc.com

management:

math workstations: learning you can count on by debbie diller

http://www.stenhouse.com/html/math-work-stations.htm

guiding principles, theory & understanding:

young mathematicians at work by catherine fosnot and maarten dolk

http://www.heinemann.com/products/E00353.aspx

bunk beds and apple boxes: early number sense by catherine fosnot

http://www.heinemann.com/products/E01006.aspx

games, games, & more games

games for early number sense: a year long resource by antonia cameron and catherine fosnot

http://www.amazon.com/Games-Early-Number-Sense-Mathematics/dp/0325010099

i  hope this helps you have a better understand of what i’m trying to wrap my head around this week.  deanna will be back later on to share about her big goals, too.  thanks to everyone who shared their ideas about what they wanted to hear more about! keep tweeting with us at us: alyssa @alyssalnewman; deanna @dee4soul; us @primaryperks; or email us primaryperks@gmail.com.

prioritizing priorities

keep_calm_and_sort_out_your_priorities_by_bambrixbam-d523qqwwe’d be lying if we didn’t tell you that we don’t have serious issues with not trying to do everything to perfection (see word study posts 1, 2, and 3…) but in all seriousness, here’s the bottom line: you (we) can’t do everything, and you (we) definitely can’t do everything well. -pause for heartbreak- BUT instead of focusing on what can’t be done, we’ve been pushing ourselves to focus on what can be done, and furthermore, what can be done well.

vacations often give us too much time to obsess over the many things that need to be fixed, done better, and let’s face it, re-done (what else are they for?!) so over the past few weeks, and especially during mid-vacation-minor-meltdowns (too much time to think), we’ve found it to be helpful to think in big chunks, creating some overarching get-it-done kind of goals for ourselves to make everything seem more manageable.

alyssa’s big goals for the upcoming week:
-writing workshop: increasing the class’ writing stamina
-math workshop: introducing new just-right games to new math partnerships (similar to guided reading, but for mathematics)
-reading small groups: reassessing/revisiting/updating reading goals

deanna’s big goals for upcoming week:
-social emotional learning: introducing learning supports to specific children
-choice time: reinvigorating center materials
-morning meeting: introducing differentiated morning routines (math and literacy focused) to partnerships

in some strange way, it makes us feel better knowing that we’re not alone. the perk of focusing on different things allows us to come back together one day a week, talk about how things went, make them better, and swap ideas (in a way more “formal” than just a before-school passing conversation… and with lots of coffee and popcorn.)

we’re each going to be back later this week elaborating on one of our big goals. which of these goals do you want us to say more about? how do you mentally manage and execute all your priorities? tweet at us: alyssa @alyssalnewman; deanna @dee4soul; us @primaryperks; or email us primaryperks@gmail.com – REALLY! we’re not lying when we say we want to hear from you!

the long-awaited, final words on word study (part 3)

well, this is awkward…we sort of feel like the guy that took a month to call you back after date number three. we’ll just pretend like that too-long hiatus never happened, shall we?

now that we have started our fully differentiated word study cycle, we have a few tips and tricks that we think are helpful to keep in mind when getting it all up and running. after all, the kids need to be as independent as possible during word study time so that you, the teacher, can maximize your teaching time with each group!

the word study center

IMG_4562

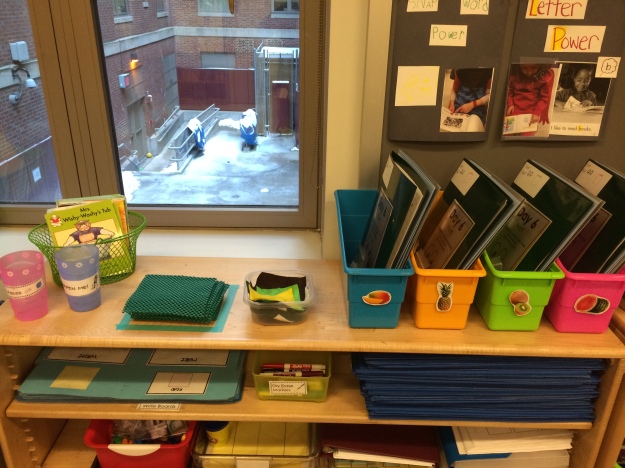
we have a whole “center” dedicated to storing our word study materials. whether you decide to use a shelf, table, or counter space, just make sure it’s accessible to the students without needing your help! here’s what we have in and around our word study centers:

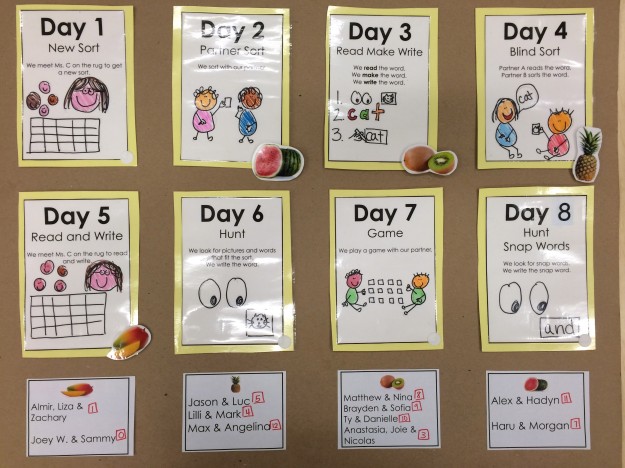
the work board is where students look to see which group they are in, who their partners are, where their work spot is, and which day of the cycle they are on. we use velcro so that we can easily move the small group mascots (fruit), since this has to be done every day you do word study.

IMG_4561

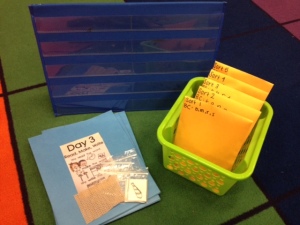
each word study group has their own bin containing their sort bags and labeled folders containing the sheets necessary for each sort. we leave the little baggies with the current sort right inside the bins so kids can grab them by themselves. we use sheets for our word hunts and read make write to help keep kids on task. the simplest way we’ve found to store these is inside folders which are clearly labeled with a photo of the sort day so that kids know exactly which folder they need. we put a red/green dot inside the folders (just like our writing folders) so kids can put their sheets on the ‘done’ side when word work is finished.

IMG_4566

we have a few other helpful tools in our word study centers like the mini-mats we mentioned in part 2 of our word study series and a cup for lost pieces (students use this cup to return any sort cards found on the floor, as well as other random objects).

IMG_4563

we strategically tape down “work spots” on the floor of our classroom to give each partnership their own work space around the room. on the work board, students can see who their partner is and where their work spot is located. we use these spots for other partner work across the day, too. they are a great visual reminder for kids where they’re supposed to be and help us make the most out of our limited classroom space.

IMG_4567

we hope this series of posts helped to reinvigorate your word study time in some way. we promise to you (and ourselves) to be back on a more regular basis. we’ve got a long list of idea to help push our own thinking, but we want to know what YOU want us to share? tweet at us: alyssa @alyssalnewman; deanna @dee4soul; us @primaryperks; or email us primaryperks@gmail.com

A & D
hiatus

…we apologize, but we’re drowning trying to swim through report cards, assessments, planning, and all the other goodies that come with a new year. to those who have been looking for us – we promise to be back soon with our closing thoughts on word study, and new thinking, too.

but just to hold you over till then, a few wordless january perks:

Image

Image

Untitled

IMG_5145


A & D

a few words on word study (part 2)

the goal of this post is to get into the more nitty gritty behind-the-scenes workings of word study – to share some of the helpful tips and tricks we’ve come up with along the way, to support your students’ learning and protect your own sanity. (if you need more of an overview, check back to last week’s post.) as you read this post, keep in mind that there are so many ways to do word study in your classroom; this has worked well for us and our colleagues.

AH! where do i even start?
remember – like we said in our last post, we start off word study going through the cycle as a whole class several times. it’s not until january when we start putting our kids into differentiated groups. in preparation for this, you will need to assess your students in order to see the spelling features they know and are using but confusing. we use the words their way kindergarten assessment with five words in the beginning of the year (this is available inside the book first book), but we typically move to the primary spelling inventory for most of our kids later in the year, and many primary teachers will need this inventory in their classrooms, too.  Once children learn those features, move to the elementary spelling inventory, and then the upper-level spelling inventory (thanks TCRWP for sharing!) we administer these assessments in small groups so that we can ensure accurate results (sometimes those little guys can’t help their wandering eyes!) then, we score the assessments and look for common needs among groups of students (you will find specific directions in the book). now, you will probably have a few outliers (kids spelling at a much higher level than anyone else in the class or kids who are not yet able to accurately form letters). in an ideal world, we would be able to form as many word study groups as needed to target students’ exact needs. but, in the real world, we know that’s just not possible. so, we try to put our students into 4 groups (for one teacher) of about 6-7 kids. a great piece of advice comes from EM, one of our favorite word study gurus, who reminds us to “be conservative” when it comes to making these groups. she says not to push kids ahead to features they’re sort-of ready for, let them work on the feature until they demonstrate their knowledge both in and out of context in reading and writing.

how do i select the right word study materials
there ARE lots of materials that you need to get ready in order to get the most bang for your buck with word study, but we think it’s totally worth it.  don’t forget about great sites like donor’s choose where you can create a ‘word study project’; that’s how alyssa got all of her materials- and it was from an anonymous donor! here’s a list of all the materials we think you should have for word study:

  • words their way books – these contain many sorts for spellers at all stages, there are five different books, you just need the ones that are at your kids’ levels
  • table tents – you’ll need one of these per partnership, they will make your lives so much easier in the long run, students’ sort cards won’t go flying all over the place (trust us, THEY WILL!!)
  • small plastic bags – why these instead of regular sandwich baggies? they are much easier for students to close on their own and fit the sort cards perfectly
  • small clasp envelopes – we use these to store our sorts when they are not in use, they are sturdy and easy to file away neatly
  • rubber mats – cut up the mats we talked about here into 4×4 squares and they become perfect “mini-mats” – a place for students to keep their sort cards in a pile while they’re working. having this boundary keeps the cards organized and manageable
  • any sturdy 2-pocket folders – you’ll need three folders per group
  • laminator and laminating sheets – this is a big investment, we know, but you will end up using it for EVERYTHING. literally, everything. you might even use it as an excuse to stay home and drink wine one night… “sorry, i have lots of laminating to do tonight for school (in my pjs, with wine, and my favorite movie, and my favorite snuggie.)”

    this is pretty much all you'll need for word study, with a few small additions that we'll address next post (don't worry - nothing crazy!)

    this is pretty much all you’ll need for word study, with a few small additions that we’ll address next post (don’t worry – nothing crazy!)

how do i make my materials last?
so now you’ve got your groups and your materials. you spent a lot of time and some money, too. don’t worry, we make sure we make these materials last so that you can use them year after year (without having to go through all this prep work again!)

side story: one summer evening, an awesome team of kindergarten teachers sat down with a huge pile of copied sorts, their laminators, scissors, colored pencils, and lots of wine. they labeled, laminated, cut, and drank for hours, only stopping to order lots of sushi. in the end, their hands were tired but their minds were at ease because they just got their sorts ready for the entire year. they all lived happily ever after, reconvening every now and again over the years with bottles of wine and laminating machines. donald bear would be proud.

copy sets of sorts
you will need to decide which sorts to copy based on the groups you have in your class. we copy our sorts right out of the book as we mentioned above. now, we go all out and copy the sorts we will probably need throughout the whole year (we think it’s just easier to get it done in one job). we go through the book and choose five different sorts within each spelling feature (five beginning consonant sorts, 5 short vowel, etc…) after we have our sorts picked out, then we make five copies of each sort so that there will be plenty of sets. **please note that you will need to make copies for however many partnerships you have for the sorts you are doing whole class in the first part of the year.

labeling backs of cards
here’s where we get a little crazy, but we thank ourselves countless times throughout the year for doing this one annoying little step. we label the backs of each sort card with the sort number and the set number. let’s say you’re doing rhyming sort 9a – you would label the first copy of that sort 9a-1 (on the back of each card on that page), the next set (or page) would be 9a-2, and so on. we also color coded it since we had some sorts from the orange book and some from the red book. any sort that came from the orange book we labeled with an orange colored pencil, any sort from the red book with a red colored pencil. the reason why we do this is because we know kids are going to lose a card from their deck every now and again. since we’re putting so much work into prepping all these materials, we don’t want to have all these incomplete sorts that we won’t be able to use the following year. so now, when a kid finds a card on the floor, they pick it up and put it in a small cup we leave with the word study materials that has a question mark on it so we can go through and easily find the matching sort that those cards came from.

laminating and cutting
after labeling each sort, we laminate them. we each have our own personal laminators, but you could use your school’s laminator (if they have one) or befriend another teacher who has one (if you haven’t already). so, we laminate each sort and then cut them out. here are some ways you can “invite” other people to help you with the FUN job of cutting: ask some of the parents to help – give them each 10 sorts and you’re already off to a good start!, find a willing 3rd grader with good fine motor skills to help you during recess (kidding…sort of), is your family having a cozy night in watching movies/watching the game on sunday? – in turn for making all those yummy snacks, they will have to cut sorts.

storing in bags
after each sort is cut, we store it in one of those little plastic bags. we also label the bag with the sort and set number, just to be super-anal.

organize your materials
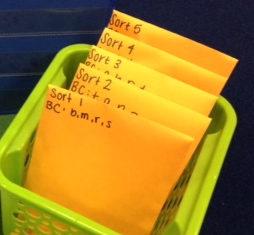
ah, okay, we know that was a ton of work. but now, all you have to do is keep them organized and you’ll be using them for years to come! we organize ours by keeping the sort bags in small clasp envelopes. they are just the right size for holding five bags per sort. we label the tops of them with the type of sort and sort number (i.e. beginning consonant sort 1 – b, m, r, s). then, store these envelopes in any sort of bin or filing cabinet and you’re good to go! the best feeling is when it comes time to introduce a new sort and all you have to go is pull out that envelope and the sorts are all ready and waiting for you to use them.IMG_9970

…and yes, we know we’re crazy.

stay tuned for part 3 of this post – we will be talking about ways that, after ALLLLLL this work, you can support your students’ independence during the magical time of word study. hopefully, all the pieces will come together and you’ll see the payoff of all the craziness in your students’ high engagement, independence, and ultimately, their learning. in the mean time, we’d love to know what you’re thinking about word study – questions, advice, etc. tweet at us: alyssa @alyssalnewman; deanna @dee4soul; us @primaryperks; or email us primaryperks@gmail.com

A & D
a few words on word study (part I)

word study is our favorite 20 minutes of the day.   every single child is highly engaged, knows exactly what to do all by themselves (!), they’re learning in differentiated groups, and having fun, too.  if you’re new to word study, here is a super quick run down on what it actually is.

  • the purpose: word study helps children become efficient problem-solvers of words in reading and writing.
  • our preferred word study curriculum: donald bear’s words their way
  • why: it’s differentiated based on the stages of spelling development (emergent, letter-name alphabetic, within-word pattern, syllables and affixes, derivational relations), and meets the needs of all our children versus teaching the same exact thing to all our word studyers.
  • assessment: the spelling inventories from donald bear and colleagues in the words their way books (you can access them inside the books.)
  • resources to learn more and convince you words their way rocks: this (your school will need the full set to implement across grades) and this
  • the gurus who got us word study obsessed: EM- thank you! (she blogs here: http://languageisliving.com/about/) & RR (she tweets here: @RachelARothman)

as we move forward in this post, we want to focus less on the what and the why (but if you want more of that info, consult some of the resources above) and talk more about the how so that you can make word study a favorite part of your day, too!  so here’s how we get all of this up and running.

the cycle

we created an 8-day-cycle for teaching word study.  eight days works nicely because it enables us to teach through one full cycle across two weeks, as long as we incorporate word study into our plans four times per week (which is easy to do at 20 minutes a pop!)

day 1: new sort – the teacher meets with students to introduce a new sort. gather your kiddos in your favorite meeting area just like you would a small reading/writing group. we introduce a new sort by saying, “today you are going to be getting a new sort! you’ve been working on paying extra close attention to the beginning parts of words. all words have a beginning part. listen closely to these words, some will have the same beginning part and others will have a different beginning part.” we’re using “beginning part” here as an example, but change the words to fit the sort you are introducing. show the students each sort card, telling/asking them what the picture is. then, ask students what they notice about the beginning parts of the words. they might be able to recognize that a lot of the words start with the same sound. next, show students the “anchor cards” or “key cards” (sort cards with a line on the bottom) and place them in separate columns (we do this right on the floor in front of the kids). sort the first few cards yourself, modeling the way you want your kids to sort. here’s how we teach our kids to sort: pick a card, “read” the card (say what the picture is), then hold the card next to each anchor card saying the card you’re holding and then the anchor card. if you are sorting beginning consonants b, m, r, s and the card you just picked is a picture of a ball, it’ll sound something like this: ball, rag (putting the ball card next to the first anchor card, rag), ball, man (moving the ball card next to the second anchor card, man), ball, bat; ball, sun. after comparing the card you drew with each anchor card, you decide where to sort your card (ball would go under the bat column since they both have the same beginning part). after you sort a few cards in front of the kids, have them try a few. it’s important that students think about why they are sorting cards in a certain way, so prompt them to think about this by asking, “why did you put that card there?” after the group is over, you will leave each partnership with their own sort bag to use for the rest of the cycle (read our next post to see how we prep and organize these).

day 2: partner sort – students work independently (no teacher) with their word study partner to sort their cards. we like giving partnerships a table tent to sort their cards in because it keeps them organized, but you could also create your own sorting mats using file folders or larger construction paper. we teach our students to put the anchor cards at the top of the table tent in different columns (one for each anchor card). the anchor cards will be the card that students use to compare all other cards against. following the sorting method mentioned for day 1, students will take turns sorting the rest of the cards. encourage partners to be helpful by saying whether they agree or disagree with their partners decision. if they disagree, teach them to give helpful advice rather than saying, “no! that card goes here.” instead, they can ask, “does bug rhyme with lock? try again!” or “do rag and ball have the same beginning sound? try again!” we also teach kids a “game” they can play once they’ve sorted all the cards called, “check it” (say it in a fun voice – turns it right into a game!) during this game, the kids read all the cards down each column, starting with the anchor card, making sure they all rhyme, have the same beginning sounds or whatever is appropriate for that particular sort.

day 3: read, make, write – we do this in slightly different ways, although the basic concept is the same. using a read, make, write mat (alyssa gives her kids a paper template for each new sort and deanna made reusable mats out of laminated file folders), students will take turns reading, making, and writing each sort card. start with cards in a pile. partner 1 draws a card and “reads” it (in the early sorts the cards are mostly pictures, so students will simply say what the picture is). partner 2 “makes” it out of a certain material. we like to change it up throughout the year but start out by using wiki-sticks. you could also have students make the word out of magnetic letters, play-do, or stamps. here, the student is writing the word the best they can. if the sort is focusing on beginning consonants b, s, and f and the card the student is making has a picture of a bat, the student is only held accountable to accurately spelling the beginning part of the word (i.e. it is okay if the student writes bt or bet because that’s not the feature they’re focusing on). next, partner 1 writes the word the best they can, following the same expectations as making the word. then they switch: partner 2 reads the next card, partner 1 makes the word, and partner 2 writes the word.

day 4: blind sort – students work with their word study partner using the table tent or sorting mat to sort the cards in a slightly different way. partner 1 reads the card without showing it to partner 2 (making partner 2 “blind”). it’s fun to have partner 2 cover their eyes while partner 1 reads it, then sorts it.  once partner 1 is done sorting, they say, “look!” and partner 2 “checks” partner one.  if it’s correct, partner 2 says, “ya got it!” and they high five. if it isn’t sorted correctly, partner 2 says, “go back and try it again! you can do it!” then, they switch.

day 5: read and write – this is the teacher’s second chance to visit each group within the cycle. again, gather the group in your meeting area for shared reading, interactive or shared writing, or other activity with a focus on the spelling concept the group is working on. we try to choose books for shared reading that have at least some words that align with the sort, but it’s also okay to work on that spelling concept in general. so, if your group is working on the th and sh digraphs, pick a book that has lots of words with digraphs (doesn’t necessarily have to be the specific digraphs of that sort because they are still working on reading and writing all digraphs). RR allowed us this bit of sanity…before we were scouring books for the EXACT matches to each sort.  we strongly advice you NOT to do this (thank you RR!)  if you’re doing shared reading, cover up some of the words that align with the sort. if you cover the whole word, you can first prompt students to think about meaning with the question, “what would make sense?” “what could go there?” if the story is about ship and the students say “boat,” that’s okay, so long as it makes sense.  ask kids if there’s anything else that could go there, maybe someone will say ship.  alternatively, you could start peeling back your post it to show the ‘sh’ digraph.  someone will undoubtedly declare, “it can’t be boat!” “how do you know?” or “what could it be?” to spark some conversation around the visual cues kids are seeing. if you are doing shared writing, plan to co-create a book, sign, etc., with your small group that will have some words that relate to their sort. give each student a dry erase board so they can practice writing the words that relate to their sort. this is what we typically do on day 5, although you may take it as an opportunity to teach something else that group desperately needs work with, like making sure they are transferring the work of word study into that of writing workshop. you may choose to have a group bring their writing folders and look for any word that aligns to the sort to check if it is spelled right and fix it if it’s not.  stretch your imagination here and dream up lots of possibilities for what you do with your kids – the options are endless (and don’t forget to share with us!)

day 6: word hunt – students work independently next to their word study partner but separately. each student needs his/her book bag with leveled just-right books and a word hunt sheet (we’ll be showing all our resources with you next week). students read their books looking for words that fit the sort. when they come across a word that fits the sort, they write the word on the word hunt sheet. now, what about when there are no words in the book that fit the sort (especially with level A/B texts)? we tell our kids to “read” the pictures, too. if they are working on the sh digraph and there is a picture of a person with shoes on, they might write the word “shoe” as best they can, only being held accountable for spelling the digraph correctly.

day 7: game – good ol’ fashioned memory or concentration, whatever you like to call it. easy to play and no extra materials required. students work with their word study partner to play the game. they set up their cards in an array, cards facing down. goal of the game: find a pair of cards that have the same spelling feature. partner 1 turns over a card and reads it, then turns over another card to try to find a match. if both cards have the same spelling feature (like ship and shell) it’s a match! partner 1 collects both cards. if the cards do not have the same spelling feature (like ship and thumb), partner 1 turns both cards back over, face down. then, it’s partner 2’s turn. we know there are many, many games out there, and many are available for download on the words their way cd.  for us, in the interest of working smarter not harder, this requires no extra work on our part, and the kids are highly engaged because remember, they’re only playing this game once every 2 weeks, so they look forward to it!

day 8: word hunt (high frequency words) – students work independently next to their word study partner but separately. each student needs his/her book bag with leveled just-right books and a word hunt sheet. students read their books, looking for any high frequency word that has been taught. when they come across a HFW, they write the word on the word hunt sheet. since it’s a HFW that has already been taught and the word is right in front of them, we expect students to spell these words correctly.

where to start

what’s important to know is that we start our entire class on the same sort in the beginning of the year. we choose a sort that is far too easy for most of our kids because we want their focus to be on what we do each day in word study, NOT learning a new concept. (side note for K teachers: last year, we started with concept sorts, i.e. fruit/not fruit, but this year we decided to start with rhyming sorts so kids could practice rhyme since that’s important for ALL kinder kids, even the ones who have rhyme.)  it’s all about routines, and so we invest the time in the first few months of the year doing each day of the cycle all together so kids become extremely fluent in the activity for each day.  come january, we reassess our kids, change the partnerships, and put our students into differentiated groups, typically four of them (if there is more than one teacher in your room you could get away with more groups).  then each group is on a different day in the cycle each day of the week, working on a sort that is developmentally appropriate for them (i.e. the ‘red group’ is on day 1, the blue group is working independently (with their partners) on day 2, the ‘green group’ independently (with their partners) on day 3, the orange group independently (with their partners) on day 4.)  we recommend doing the routine whole class for 10 weeks in kinder, and 6-8 weeks in 1st & 2nd before splitting your kids into differentiated groups. (another side note to K teachers, if you’re doing the math, we didn’t start doing sorts until the end of october because we did ‘star name’ 4 times a week as our word study work at the start of the year.)

next time

we plan to share some things we’ve created, and all of our tips and tricks for selecting, making, buying, prepping, and organizing word study materials, because yes, it takes a lot of time, and yes, there are lots of materials.  but, we truly feel the investment is worth it and pays off every single day, so stay tuned.

in the mean time, we’d love to know how word study goes in your classrooms, or any questions you might have that we can address in our next post.  tweet at us: alyssa @alyssalnewman; deanna @dee4soul; us @primaryperks; or email us primaryperks@gmail.com

A & D